In this Part-2 recording I will cover the VMware Aria Automation Upgrade from 8.16 to 8.18 Using VMware Aria Suite Lifecycle Manager aka vRLCM.
My Lab Environment: VMware Aria Automation 8.16 – Single node instance
VMware Workspace One Access 3.3.7 (vIDM) -Single node instance
VMware Aria Suite Lifecycle 8.18
Prerequisites: follow the VMware Aria Suites products upgrade sequences. in my case I have already upgraded the vRLCM 8.16 to 8.18 and vIDM 3.3.6 to 3.3.7 before starting the Aria Automation Upgrade.
Part-2, VCF DSM 2.1.1, In this recording will cover the Installation and Basic configuration of DSM 2.1.1 Release.
The following steps are covered in this video: 1. Instatllion of DSM appliance using vCenter UI 2. DSM vCenter client plugin registration 3. Creation of DSM IT Policy using vCetner console (IT Policy, IP Pools, VM Class) 4. DSM User Permission and DSM Local user account creations (DSM Admin and DSM users account) 5. Active Directory Service integration with DSM (Import AD trusted root certificate) 6. Active Directory User Groups settings 7. Verification of DSM RBAC using both DSM users and AD users accounts. 8. Enable Data Services templates for MySQL and Postgres 9. Create or Provision PostgreSQL standalone instance 10. Connect to Postgres database instance using pgAdmin.
VCF DSM or VMware Data Service Manager 2.1 and 2.1.1 release includes the following new features and improvements.
Easy installation process: DSM 2.1 Installer OVA is bundled with database templates. These templates remove the requirement of S3 object storage for DSM installation. However, S3 Object Storage is still required for backups and logs.
DSM 2.1 improved alerting for easy troubleshooting
Improved Certificate Management
Notable Database management improvements: MySQL now supports stand-alone and 3 Nodes Cluster Deployments, LDAP Authentication for Databases.
In this blog post, I would like to share the recent SRM 8.7 to 9.0.2 Upgrade experience. VMware Site Recovery Manager Upgrade from 8.7 to 9.0.1. the SRM upgrade completed successfully but the SRM client plug-in for vCenter shows in failed status.
We raised the GSS support case. We understand from the support Engineer that this issue has been reported as known issues with SRM 9.01 version when you have vCenter 7.0.3 environment. Reference: KB No. 372690.
The above KB mentioned that SRM & VRMS 9.0.1 plug-in is not compatible with vCenter 7.0.3 but works fine with vCenter 8.0.2. Note: SRM functionalities are not affected. The only issue is that users can’t launch the SRM UI from vCenter Server. Nevertheless, the admin user can access the SRM UI directly by accessing SRM or VRMS URLs at https://srmfqdn/dr or https://vrmsfqdn/dr.
GSS suggested the proposed feasible options: 1. Upgrade the vCenter Version from 7.0.3x to 8.0.2 2. Upgrade the SRM version from 8.7 to SRM 9.0 3. Upgrade the SRM version from 8.7 to SRM 9.0.2 4. Upgrade the SRM version 9.0.1 to 9.0.2 5. Use the interim fix, to access SRM UI you will need to access it via the link at https://srmfqdn/dr or https://vrmsfqdn/dr
In our case, we can’t select Choice No.1. It is a production environment. It requires another CR to upgrade the vCenter version. We have opted for the choice nos. 4. Upgrade the SRM version 9.0.1 to 9.0.2 which is a suitable resolution. Choice No. 4 also we have encountered the issues that “Operation Failed”, Failed to install update: Unknown error 243.
We have referred to this KB Nos.372249 and installed this patch ‘dr-configurator-9.0.1-76796489.x86_64.rpm‘ to resolve the upgrade installation issue. After installing the patch as per the steps mentioned in the KB372249. The SRM Upgrade from 9.0.1 to 9.0.2 completed successfully.
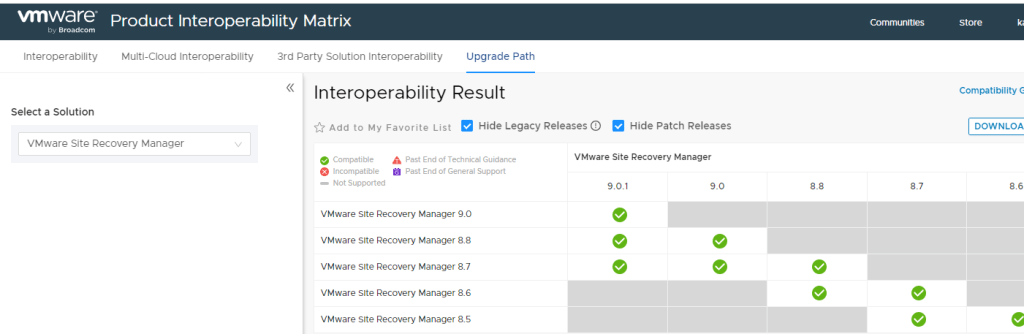
Another caveats is the VMware upgrade path does not shows the SRM 9.0.2 since the product name has been changed as VMware Live Site Recovery (VLSR). VMWare Site Recovery Manager Upgrade Path:
In the previous post (Part -2) Covered the installatoin of Horizon 8 Connection (Standard) Server, in this section (Part 3) I will cover installation of Horizon 8 Replica Server.
Horizon Replica Server Overview:
Horizon Connection Server first installation instance is called Standard Server, to have high availability and load balancing we need to have more than a connection server in a pod, we can have maximum of 7 connection servers in a single pod.
Horizon Replica server Hardware system requirements same as Horizon Connection server, the only requirement is, you must install the replica server instance in the same physical location (data Center) of the connection Server instance installed. in case your requirement to deploy Horizon 8 span across multiple data Center it is recommended to make use of the Cloud Pod Architecture feature.
Watch the below video to understand Horizon 8 Replica server installation steps.
In the previous post (Part -1) I have covered the high level Horizon 8 architecture and core components specifications, in this section (Part – 2) I will cover installation of Horizon 8 Connection Server.
Horizon 8 Connection Server Prerequesites.
Before starting the installation of first connection server (Standard Server) make sure that required prerequisites are in place. Such as supported version of Active Directory, Service accounts, Static IPs, network ports are open, Horizon Installer, Licenses etc.
Introduction:
The following blog post intent to cover the basic step by step of installation and configuration of VMware Horizon 2212 on-premises LAB environment to understand core components of VMware Horizon 8.
The installation steps are broken into multiple parts, this part cover the high-level architecture and components involved.
1. High Level Horizon 8 Architecture Overview.
2. Horizon 8 VDI infrastructure core components and specification.
The following servers and configuration used in my lab setup, Production deployment refer the VMware’s documentation.
Sl No
Name of Server
IP Address
Qty
Configuration
Core Service
Version
Remarks
01
BITLABADC01
192.168.44.100
01
2vCPU, 4GB vRAM, 60GB HDD
Active Directory, DNS, DHCP, file share, PKI
Windows Server 2012 R2 STD
Domain Controller
02
BITLABESXI01
192.168.44.102
01
16 vCPU, 32GB vRAM, 400GB HDD
ESXi Server
7.0.3
Horizon Management Servers hosting
03
BITLABESXI02
192.168.44.103
01
16 vCPU, 32GB vRAM, 150GB HDD
ESXi Server
7.0.3
VDI Workloads Hosting
04
BITLABVCSA01
192.168.44.104
01
2vCPU, 12 GB RAM,
vCenter Appliance
7.0.3.01300
vCenter Appliance
05
BITLABCS01
192.168.44.105
01
2 vCPU, 4GB vRAM, 60GB HDD
Horizon Connection Server
Windows 2019 STD
Connection Server Standard
06
BITLABRCS02
192.168.44.106
01
2 vCPU, 4GB vRAM, 60GB HDD
Horizon Replica Server
Windows 2019 STD
Connection Server Replica
07
BITLABAPV01
192.168.44.107
01
4GB vRAM, 2vCPU, 50GB vDisk
App Volumes Manager
Windows 2019 STD
App Volumes Manager
08
BITLABDEM01
192.168.44.112
01
2 vCPU, 4GB vRAM, 60GB HDD
VMware Dynamic Environment Manager
Windows 2019 STD
Dynamic Environment Manager
09
BITLABSQL01
192.168.44.114
01
2 vCPU, 4GB vRAM, 60GB HDD
SQL Server Database
MS SQL 2017 STD
Horizon Events DB, App Volume DB
10
BITLABWIN10-Master
DHCP
01
2 vCPU, 2GB vRAM, 40GB vDisk
Windows 10 VM
Windows 10 x64
Windows 10 Master Image
11
BITLABWIN10-REF
DHCP
01
2vCPU, 2GB vRAM, 40GB vDisk
Windows 10 VM
Windows 10 x64
Windows 10 Refence VM for App Stack Capturing
Note:
The above server configuration used in my LAB environment deployment, for production environment deployment follow the VMware’s official sizing recommendations and do through assessment of your environment to have get VDI experience.
I hope you will get basic useful idea from this Lab deployment series, stay tuned for next post Part-2 Installation of Horizon Connection Server.