Introduction: The following blog post aim to cover the basic evaluation of VMWare Workspace ONE UEM, Workspace ONE Access integration and configuration in LAB environments. To deploy in production environment, recommended to refer VMWare Workspace ONE Documentation.
- The following design architecture, I am planned to setup in my LAB.
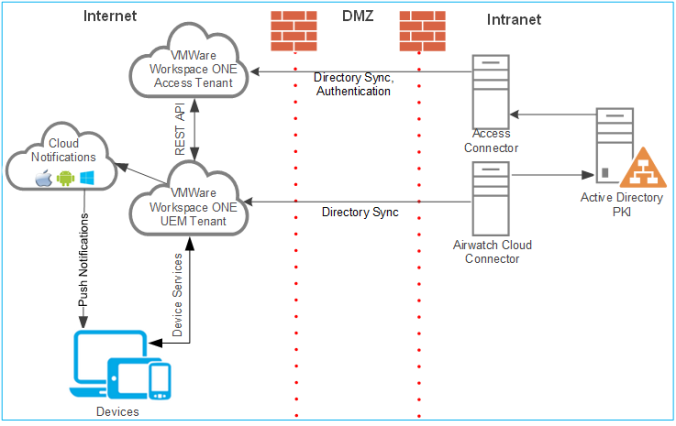
- The following Prerequisites required:
-
VMWare Workspace One UEM, Workspace ONE Access
We can also make use of 30days trail subscription of Workspace ONE UEM SaaS Tenant, Workspace ONE Access SaaS Tenant.
In my case I am using VMWare sandbox Tranent as below:
| Workspace ONE UEM | https://cn5xx.awmdm.sg | UEM Console version: 21.1.0.2 (2101) |
| Workspace ONE Access | https://td-as1kalyan-4axxx.vidmpreview.com | Console Version: |
- On-Premises Servers Requirement:
| Sl No | Server name | Server Role | OS Version | vCPU | vRAM (GB) | vDisk (GB) | IP Address | Remarks |
| 01 | RWSDC01 | ADCS, DNS, PKI. Airwatch Cloud Connector |
Windows Server 2012 R2 | 2 | 2 | 50 | 192.168.44.100 | I have installed Airwatch Cloud Connector on AD DS Server. Note: Production setup recommend having separate server. |
| 02 | LABWS1ACC01 | WS1 Access Connector | 2 | 2 | 50 | 192.168.44.11 |
Note: Airwatch Cloud Connector,
WS1 Access Connector Servers sizing based on my lab requirements.
Production deployment recommended to follow the VMware recommended Architecture hardware sizing Guidelines.
- I have selected the following Endpoint Devices for testing:
| Device Type | OS Version | Qty | Remarks |
| Android | 10 | 1 | Samsung Galaxy S10+ |
| iOS | 14.4 | 1 | Apple Phone 7+ |
| Windows 10 Education Edn. | 1809 (OS Build 17763.1697) |
1 | Virtual Machine |
| macOS Catalina | 10.15.5 | 1 |
Let’s get start the installations of ACC step by step.
- Installation and Configuration.
C(1): Install and Configure the Airwatch Cloud Connector
-
Login to Workspace ONE UEM Console https://cn51x.awmdm.sg

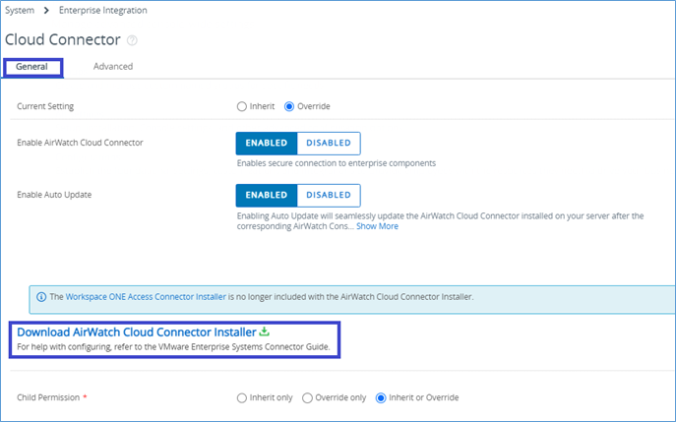
- From the main menu, navigate to Groups & Settings— > All Settings– > System— > Enterprise Integration –> Cloud Connector.
-
Select Override.

- Select Enable for Enable Airwatch Cloud Connect Setting.
- Select Enable for Enable Auto Update (Note. This is LAB setup I have selected Auto Updates, Production environment you need to consider your organisation upgrade policy)
-
Click the Advanced tab and ensure that Use External AWCM URL is highlighted

- Click Save and wait for the certificate to be populated
-
Click the General tab and click Download Airwatch Cloud Connector Installer
- You will get a prompt to key in the download password, enter password: xxxxxx (minimum 6 characters long)
-
Click Download

- Click Save File
-
After the Download finishes.

-
Copy the installer file to Airwatch Cloud Connector Server

- Rick click Airwatch Cloud Connect 21.1.0.0 Installer and Select Run as an Administrator
-
Click Next

-
Select the check box for I accept the terms in the license agreement and click Next

-
Accept the default installation path and click Next. (Note. Production installation you may have to select different path based on your IT Policy)

- For the certificate password, Enter password: xxxxxx
- Click Next
-
Verify the check box for Outbound Proxy? I am not using proxy, so I deselected and Click Next.

-
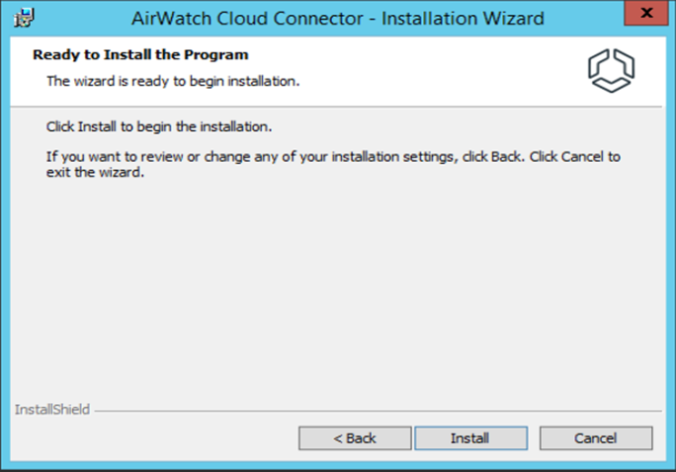
Click Install
-
Installer prompt to inform that TLS 1.2 registry keys were added, Click OK.

-
Click Finish

- You may receive a prompt to restart the Server, Click Yes to continue
-
Login to Server and Verify that the AirWatch Cloud Connector service is running.

-
Airwatch Cloud Connector installation log available at below location.

- Let’s switch to WS1 UEM Console, Open the Cloud Connector Page to test the connector Connection test.
-
Main Menu navigate to Groups & Settings– > All Settings– > System– > Enterprise Integration– > Cloud Connector

-
Click Test Connection

Airwatch Cloud Connector Installed successfully.
C(2): Configure Active Director Service in Workspace ONE UEM Console.
The following steps need to be done in WS1 UEM Console to configure AD Services:
- Integrate WS1 UEM Environment with AD Service
- Configure Filter Searches to identify Users and User Groups.
- Configure the Setting to Auto-Merge and Synchronize changes between WS1 UEM groups and AD Service Groups.
- Map attribute values between WS1 UEM user attributes and AD attributes.
Let’s start the AD and WS1 UEM integration Configurations:
-
Login to Workspace ONE UEM Console
-
Click on Groups & Settings, Select All Settings
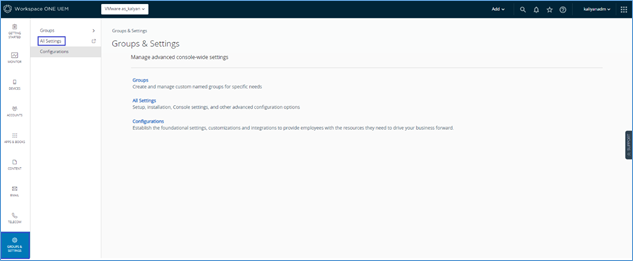
-
Click on Systemà
Enterprise Integrationà
Directory Services

-
Select Server tab, Select Current Setting set to Override
- Select Directory Type: LDAP – Active Directory
- DNS SRV select Disabled
- Server: RWSDC01.LABDC.COM (enter Active Directory FQDN name)
- Encryption Type: NONE
- Port: 389
- Protocol Version: 3
- Use service account Credentials: Disabled
- Bind authentication Type: GSS-NEGOTIATE
- Bind user name: labdc\uemsync
- Password: xxxxxx
- Domain: LABDC.COM
- Click Test Connection to verify the connectivity
- Click Save
- Select Directory Type: LDAP – Active Directory
-
On the Directory Services page, Click the User tab and type the User Settings
- Click + sign next to the Base DN Box.
- In the Base DN menu Select DC=labdc,DC=com
- Click Save

- Click + sign next to the Base DN Box.
-
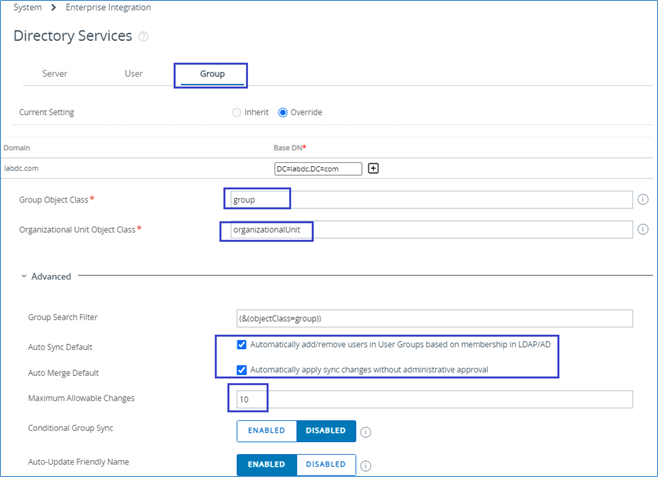
On the Directory Services page, Click the Group tab and type the Group Settings
- Click + sign next to the Base DN Box.
- In the Base DN menu Select DC=labdc,DC=com
- Group Object Class: group
- Organizational Unit Object Class: organisationalUnit
- Expand > Advanced to display additional settings
- Make sure that “Auto Sync Default and Auto Merge Default Selected
- Click + sign next to the Base DN Box.
Notes:
I. Selecting the Auto sync and Auto merge option settings automatically adds or removes users in WS1 UEM configured user groups based on their membership in Active Directory Services and automatically applies synchronization changes without requiring an admin’s approval.
II. Adjust the Maximum allowable changes limit as per your requirement.
- Scroll down to the Attribute / Mapping Value Section
- Change the mapping value for Organizational Unit to cn
- Click Save
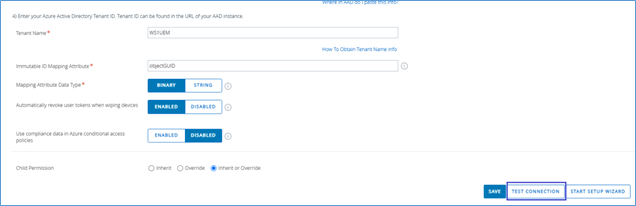
- Click Test Connection to
verify the Configuration and click by clinging X at the top right corner.


Now the directory Service user / groups attributes mapping configuration completed. Next will enable Directory Authentication Enrollment.
C(3): Enable Directory Authentication Enrollment.
- Login to Workspace ONE UEM Console: https:cn5xx.awmdm.sg
-
Goto Groups & Settings
à
All Settingsà
Devices & Users
à Generalà
Enrollmentà
Authentication.
- Current Setting: Select Override
- Authentication Modes, Select Basic and Directory
- Click Save
- Current Setting: Select Override

-
Click on Grouping tab
- Current Setting: Click Override
- Group ID Assignment Mode: Select Default
- Click Save
- Current Setting: Click Override

- After saving successful click on X mark to close the setting page.
C(4): Configuration of Importing a user group.
This configuration required to import the user groups from existing Active directory into Workspace ONE UEM.
- Workspace ONE UEM Console navigate to Accountà Users Groupà
List ViewàAddà
Add User Group

-
Add User Group page:
- select Type: Directory
- External Type: Group
- Search Text type” group name and click Search
- select Type: Directory

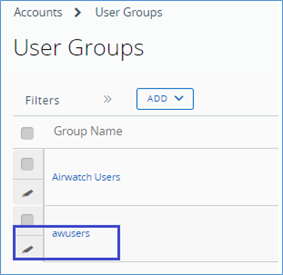
- Select Group name in my case “awusers“
- Click Save
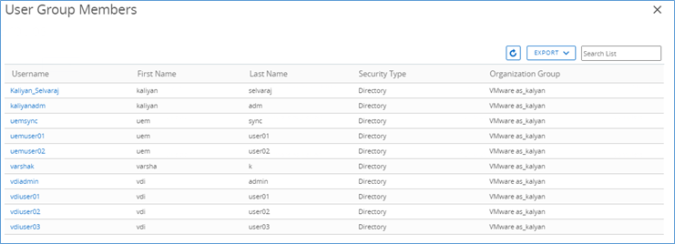
- Select imported group name “awusers” and click on More Action and Select Add missing Users

- Verify the user’s part the group added into UEM

- We can see the about 10 users have been added from AD group to UEM
- Click on pencil mark near the Group name
- In General tab Select Add Group Members Automatically to Enabled

- Click Save
We have successfully synchronized the Active Directory users accounts to Workspace ONE UEM.
Next part 2 will focus on installation and configuration of Workspace ONE Access connector. Stay tune for next post soon.
Thanks for visiting my blog post.
