
What’s New for 2025? Level Up with VMware {code}!
Announcements | What’s New for 2025? VMware {code} Community Calls: A Space to Learn, Share, and Connect; plus Certification Study Groups. – Find out the details here and get involved!
Announcements | What’s New for 2025? VMware {code} Community Calls: A Space to Learn, Share, and Connect; plus Certification Study Groups. – Find out the details here and get involved!
In this Part-2 recording I will cover the VMware Aria Automation Upgrade from 8.16 to 8.18 Using VMware Aria Suite Lifecycle Manager aka vRLCM.
My Lab Environment:
VMware Aria Automation 8.16 – Single node instance
VMware Workspace One Access 3.3.7 (vIDM) -Single node instance
VMware Aria Suite Lifecycle 8.18
Prerequisites: follow the VMware Aria Suites products upgrade sequences. in my case I have already upgraded the vRLCM 8.16 to 8.18 and vIDM 3.3.6 to 3.3.7 before starting the Aria Automation Upgrade.
I strongly recommend to read through the VMware Aria automation 8.18 release notes and Product Support Pack Release notes, make sure system requirements are met.

Before starting the upgrade check the VMware products interoperability and upgrade path using https://interopmatrix.broadcom.com/ portal.
Refer the VMware Aria Automation documentation for more information.
Lets take look at the vRA upgrade recording.
Part-1 VMware Aria Automation 8.16 Installation by Using VMware Aria Suite Easy Installer.
In this recording will cover the installation and Quick start launch of Aria Automation 8.16 using VMware Aria Suite Easy Installer.
The following steps need to complete before start installation.
1. Download the VMware Aria Automation lifecycle installer ISO
2. Pre-stage the DNS records for the following instances:
a. VMware Aria Suite Lifecycle aka vRLCM
b. VMware Identity Manager aka (vIDM)
c. VMware Aria Automation aka (vRA)
Note: This is lab environment I have installed standalone instance of vIDM and vRA for the Production deployment you must deploy the cluster instances which required the external load balancer.
References:
Install Aria Automation by using VMware Aria Suite lifecycle easy installer
VMware Aria Automation documentation
Part-2, VCF DSM 2.1.1, In this recording will cover the Installation and Basic configuration of DSM 2.1.1 Release.
The following steps are covered in this video:
1. Instatllion of DSM appliance using vCenter UI
2. DSM vCenter client plugin registration
3. Creation of DSM IT Policy using vCetner console (IT Policy, IP Pools, VM Class)
4. DSM User Permission and DSM Local user account creations (DSM Admin and DSM users account)
5. Active Directory Service integration with DSM (Import AD trusted root certificate)
6. Active Directory User Groups settings
7. Verification of DSM RBAC using both DSM users and AD users accounts.
8. Enable Data Services templates for MySQL and Postgres
9. Create or Provision PostgreSQL standalone instance
10. Connect to Postgres database instance using pgAdmin.
Refer the VMware documentation to know more about DSM 2.1.1 Installation and Configurations
VCF DSM or VMware Data Service Manager 2.1 and 2.1.1 release includes the following new features and improvements.
In this blog post, I would like to share the recent SRM 8.7 to 9.0.2 Upgrade experience.
VMware Site Recovery Manager Upgrade from 8.7 to 9.0.1. the SRM upgrade completed successfully but the SRM client plug-in for vCenter shows in failed status.

We raised the GSS support case. We understand from the support Engineer that this issue has been reported as known issues with SRM 9.01 version when you have vCenter 7.0.3 environment.
Reference: KB No. 372690.
The above KB mentioned that SRM & VRMS 9.0.1 plug-in is not compatible with vCenter 7.0.3 but works fine with vCenter 8.0.2.
Note: SRM functionalities are not affected. The only issue is that users can’t launch the SRM UI from vCenter Server. Nevertheless, the admin user can access the SRM UI directly by accessing SRM or VRMS URLs at https://srmfqdn/dr or https://vrmsfqdn/dr.
GSS suggested the proposed feasible options:
1. Upgrade the vCenter Version from 7.0.3x to 8.0.2
2. Upgrade the SRM version from 8.7 to SRM 9.0
3. Upgrade the SRM version from 8.7 to SRM 9.0.2
4. Upgrade the SRM version 9.0.1 to 9.0.2
5. Use the interim fix, to access SRM UI you will need to access it via the link at https://srmfqdn/dr or https://vrmsfqdn/dr
In our case, we can’t select Choice No.1. It is a production environment. It requires another CR to upgrade the vCenter version.
We have opted for the choice nos. 4. Upgrade the SRM version 9.0.1 to 9.0.2 which is a suitable resolution.
Choice No. 4 also we have encountered the issues that “Operation Failed”, Failed to install update: Unknown error 243.

We have referred to this KB Nos.372249 and installed this patch ‘dr-configurator-9.0.1-76796489.x86_64.rpm‘ to resolve the upgrade installation issue.
After installing the patch as per the steps mentioned in the KB372249. The SRM Upgrade from 9.0.1 to 9.0.2 completed successfully.


Another caveats is the VMware upgrade path does not shows the SRM 9.0.2 since the product name has been changed as VMware Live Site Recovery (VLSR).
VMWare Site Recovery Manager Upgrade Path:
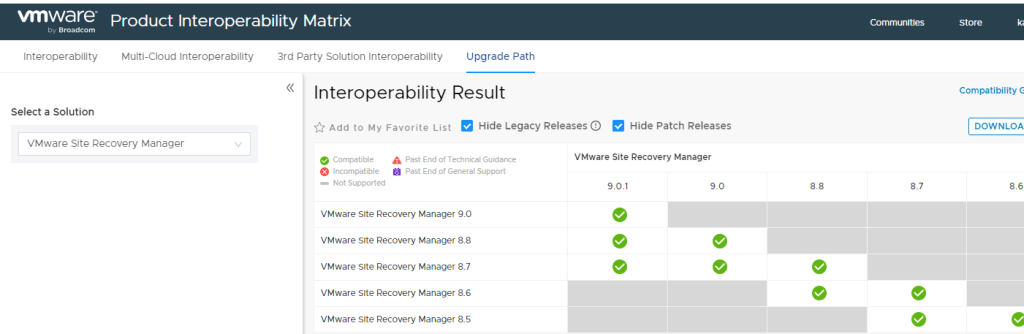
VMware Live Site Recovery Upgrade Path:

Refer the VLSR 9.0.2 Release notes for known issues and limitations.
Pro-Tips: You can upgrade the SRM 8.7 or 8.8 to VMware Live Site Recovery 9.0.2
Reference KB321929 Upgrade SRM 8.4 to 9.0.
Part-2. The Video Recording covers the following sections of DSM Provider.
DSM 2.0 Supported Versions of vSphere Components
| Components | Supported Versions |
| Center Server | 7.0.3i and later |
| ESXi | 7.0 and later |
| VMFS | 5 and 6 |
| PostgreSQL | 12.17, 13.13, 14.10, and 15.5 |
| MySQL | 8.0.29, 8.0.31, 8.0.32, 8.0.34 |
DSM Provider Virtual Machine Configuration Requirements
| VM | Environment | Memory | CPU | Storage |
| Provider VM | Default Configuration | 16 GB | 8 vCPU | 736 GB (Thin Provisioning) |
DSM Provider VM required the following Stroage repository which should S3 compatable Stroage, in my lab I am using MinIO S3 Object Storage on Linux.
The recommended size of the S3-Compatible Storage dempends on the size of data backup and retention policy.
Refer the blog post from Cormac Hogan, How to Create Least privileged service account for DSM.
Refer the VMware documents for detailed network ports and storage requirements.
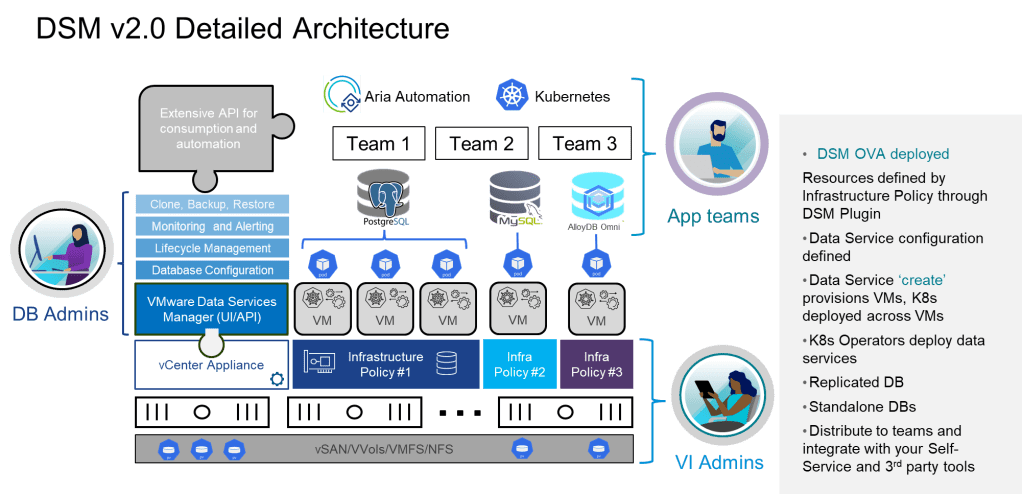
VMware released new version of DSM 2.0.3 on 6th May 2024, there is architectural changes in this release compare to previous version 1.x. detailed changes refer the VMware Data Service Manager release notes 2.0.
VMware Data Service Manager provides modern database and data services management for VMware vSphere. DSM Provides a data-as-a-service (DaaS) toolset for on-demand provisioning and automated management of PostgreSQL, MySQL databases in vSphere/VCF environment.
DSM 2.0 Architecture and Components
The following main components of the Architecture are:
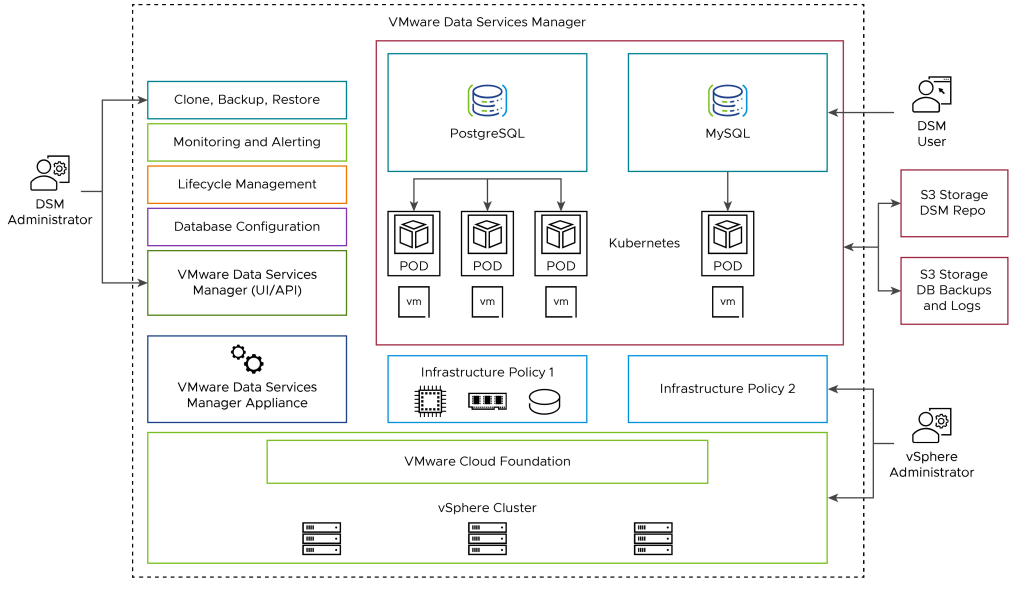
VMWare Data Service Manager User Roles:
There are Three type of Primary user roles in DSM 2.0
Next Part-1.1. will cover DSM 2.0 Hardware and Software Requirements.
The previous post (Part-3). I have covered installation of Horizon 8 Replica Server, in this section (Part-4) I will go through the Initial configurations of Horizon 8.
Before starting the Configurations make sure the following prerequisites are in place.
Note: In this lab setup I am using the single domain user account which is assigned the vCenter Server Integration and Instant Clone admin privileges, for the production deployment refer the VMware documentations.
Look at the below video to understand the configurations.
In the upcoming post (Part-5) I will cover the Horizon’s Events Database Configuration.
Happy Reading!
Kaliyan

